On this page
Bitbucket Data Center
This page covers how to configure Pipelines-as-Code with Bitbucket Data Center. Use this method when your organization runs a self-hosted Bitbucket Data Center instance.
Prerequisites
- A running Pipelines-as-Code installation
- A Bitbucket Data Center HTTP access token with
PROJECT_ADMINorREPOSITORY_ADMINpermissions (see below) - The public URL of your Pipelines-as-Code controller route or ingress endpoint
Create a Bitbucket HTTP Access Token
Generate an HTTP access token using one of the following token types:
- Personal HTTP access token
- Repository HTTP access token
- Project HTTP access token
For detailed instructions on creating and managing access tokens, refer to the official Bitbucket Data Center documentation: https://confluence.atlassian.com/bitbucketserver/http-access-tokens-939515499.html
The token must have either PROJECT_ADMIN or REPOSITORY_ADMIN permissions. If Pipelines-as-Code needs to process pull requests from forked repositories, the token must also have administrative access to those forked repositories. Without this access, Pipelines-as-Code cannot retrieve the required pull request information or interact with the forked repository.
LICENSED_USER global permission) for group-based
permission checks to work. If the user account is an unlicensed technical
user, group membership cannot be resolved and users with group-only access
will not be able to trigger builds. As a workaround, add those users
individually to the project or repository permissions.Store the generated token in a safe place, or you will have to recreate it.
Webhook Configuration (Manual)
Pipelines-as-Code does not support tkn pac create repo or tkn pac bootstrap for Bitbucket Data Center. You must configure the webhook manually.
Create a webhook on the repository following this guide:
https://support.atlassian.com/bitbucket-cloud/docs/manage-webhooks/
- Add a secret or generate a random one with:
head -c 30 /dev/random | base64-
Set the payload URL to the Pipelines-as-Code public URL. On OpenShift, get the public URL of the Pipelines-as-Code route like this:
echo https://$(oc get route -n pipelines-as-code pipelines-as-code-controller -o jsonpath='{.spec.host}') -
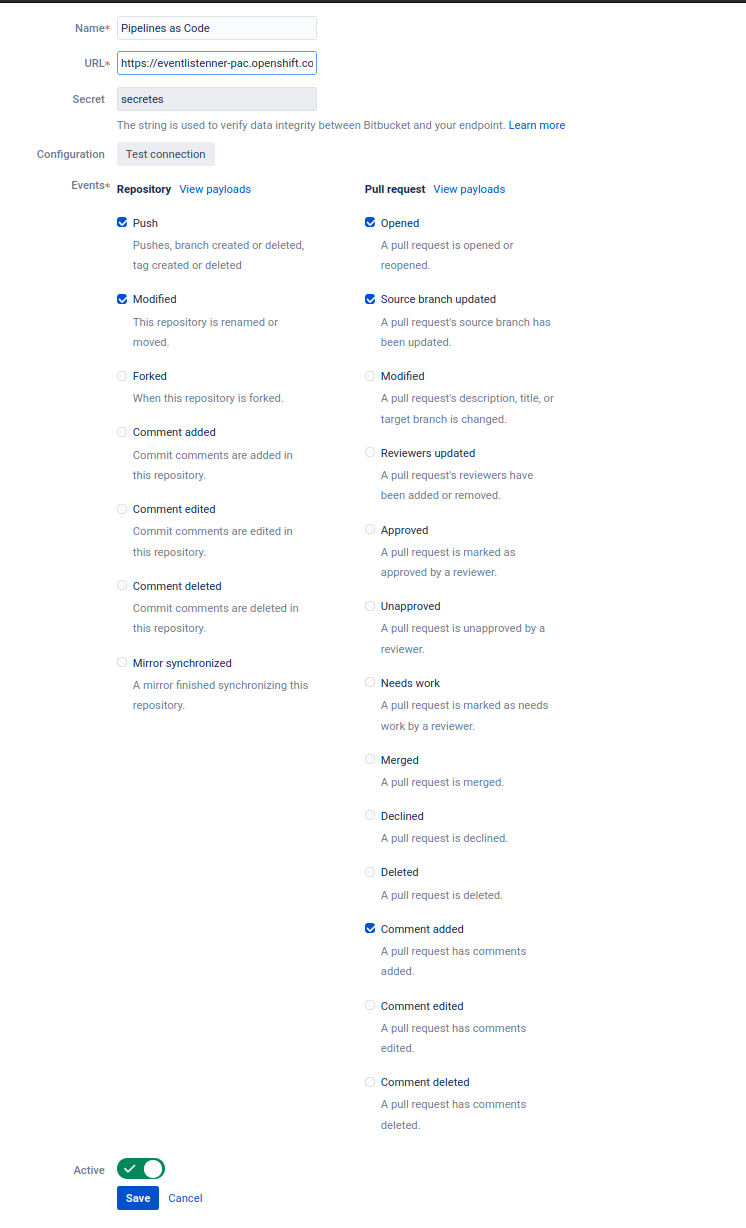
Refer to this screenshot for which events to select on the webhook. The individual events to select are:
- Repository -> Push
- Repository -> Modified
- Pull Request -> Opened
- Pull Request -> Source branch updated
- Pull Request -> Comments added
Create the Secret
Create a Kubernetes secret containing your personal token and the webhook secret in the target-namespace (the namespace where your pipeline CI runs):
kubectl -n target-namespace create secret generic bitbucket-datacenter-webhook-config \
  --from-literal provider.token="TOKEN_AS_GENERATED_PREVIOUSLY" \
  --from-literal webhook.secret="SECRET_AS_SET_IN_WEBHOOK_CONFIGURATION"
Create the Repository CR
Create a Repository CR with the secret field referencing it:
  ---
  apiVersion: "pipelinesascode.tekton.dev/v1alpha1"
  kind: Repository
  metadata:
    name: my-repo
    namespace: target-namespace
  spec:
    url: "https://bitbucket.com/workspace/repo"
    git_provider:
      # make sure you have the right bitbucket data center api url without the
      # The base URL of your Bitbucket Data Center instance. Do not include the /rest suffix.
      url: "https://bitbucket.datacenter.api.url"
      user: "your-bitbucket-username"
      secret:
        name: "bitbucket-datacenter-webhook-config"
        # Set this if you have a different key in your secret
        # key: "provider.token"
      webhook_secret:
        name: "bitbucket-datacenter-webhook-config"
        # Set this if you have a different key for your secret
        # key: "webhook.secret"
Notes
-
The
git_provider.secretkey cannot reference a secret in another namespace. Pipelines-as-Code always assumes it is in the same namespace where the Repository CR has been created. -
The
tkn pac createandtkn pac bootstrapcommands are not supported on Bitbucket Data Center.
- You can only reference a user by the
ACCOUNT_IDin the owner file.
PipelineRuns as Required Builds
Pipelines-as-Code reports each PipelineRun with a build status to Bitbucket Data Center. To use a PipelineRun as a required build for pull request merge checks, add the following annotation to it:
apiVersion: tekton.dev/v1
kind: PipelineRun
metadata:
  annotations:
    pipelinesascode.tekton.dev/bitbucket-required-build-parent: pr-validation-build
The annotation sets the parent build under which Bitbucket groups the
PipelineRun status. You can use any parent build name, including names with
spaces and special characters. This guide uses pr-validation-build as an
example.
To add the PipelineRun as a new required build merge check for pull requests in a repository, you need repository administrator permissions:
- Go to Repository settings > Required builds.
- Select Add required builds.
- On the Add required builds page, enter
pr-validation-buildand select the PipelineRun build reported by Pipelines-as-Code. - Select Save.
For more details, see the Bitbucket Data Center documentation on checks for merging pull requests.